Tutorial : How to Create a Hypercert
On chain proof of public good.

Welcome Bankless Nation.
Today we will learn what hypercerts are and how to create a Hypercert. Hypercerts essentially are NFTs that hold the who, where and when data of impact.

To create a hypercert, first you need to connect your wallet to the Hypercerts app. Click the "Connect Wallet" button on the top right corner of the screen. Select your wallet and sign the message that pops up.

Now you are ready to create a hypercert. To start, click the "Create" button on the top menu.

This will take you to the “Create New Hypercert” window. Here you will start filling in the fields. First field is the name of your Hypercert.
Next you will be asked for a link to your logo. You can use an online service like Imgur to store your images. Copy the link to your logo and paste it in the second field.
Third field is for a background banner image link. You can repeat the process from the previous input, upload your image to an online hosting service and paste your new image link in the third field.

Description field is for a human readable description of your work. It is advised to stick to a maximum of 500 characters. Markdown is supported so you can add links for more information.
Next is the Link Field, representing the main valid link of the project. This can be a twitter post to your event or a file on the IPFS of your report.

In the Hypercert Fields category, the first field will be Work Scope. Here you can write the scope of your work as key words and they will be shown on the hypercert.
Work start date and end date can vary for every hypercert. It can be a one day event with the same start and end days, or the time between gitcoin rounds.

List of Contributors to the Work is the list of all contributors involved in the work. Contributors are ideally wallet addresses or ENS names, but can also be names or multisigs. This will not distribute any fractions to the contributors written here.
Advenced Fields should not be changed at this time.

Distribution is where you will define the wallets that you want to distribute your tokens. Upload your csv to a service like Litterbox or Pinata and paste the link in the input field.
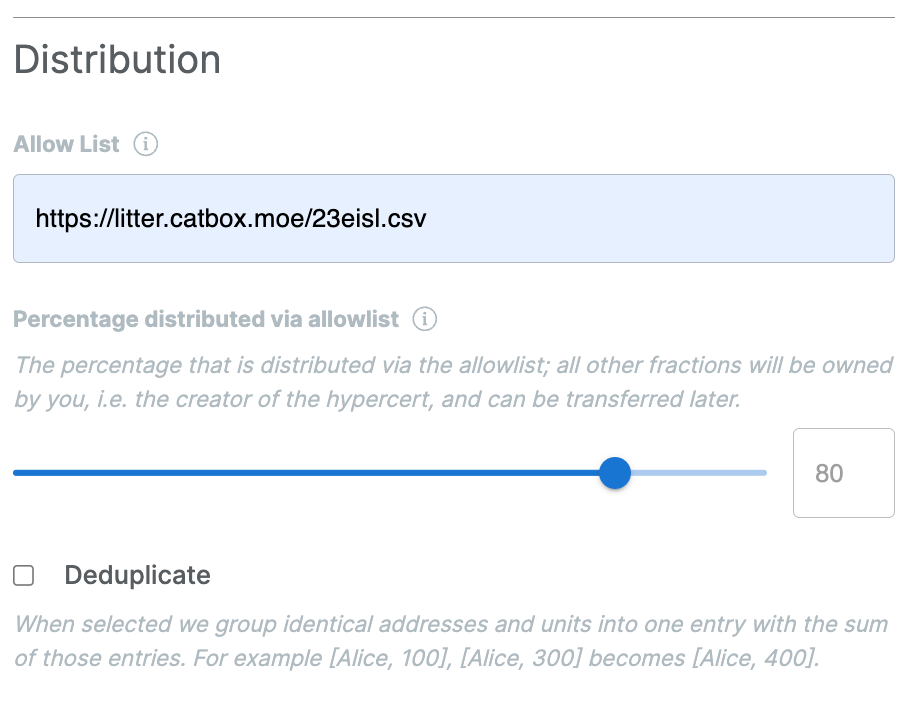
With the Percentage distributed via allowlist slider, you can adjust the percentage that you want to distribute. The rest will be owned by the hypercert creator. You can use this template csv file to make your distribution. Keep in mind that the price should always stay as “0.0”.
Total amount of fractions of a hypercert (F) = the number of fractions defined in the CSV (N) * (1/slider percentage (P))
F=N×( 1/P)
For example, consider this table:
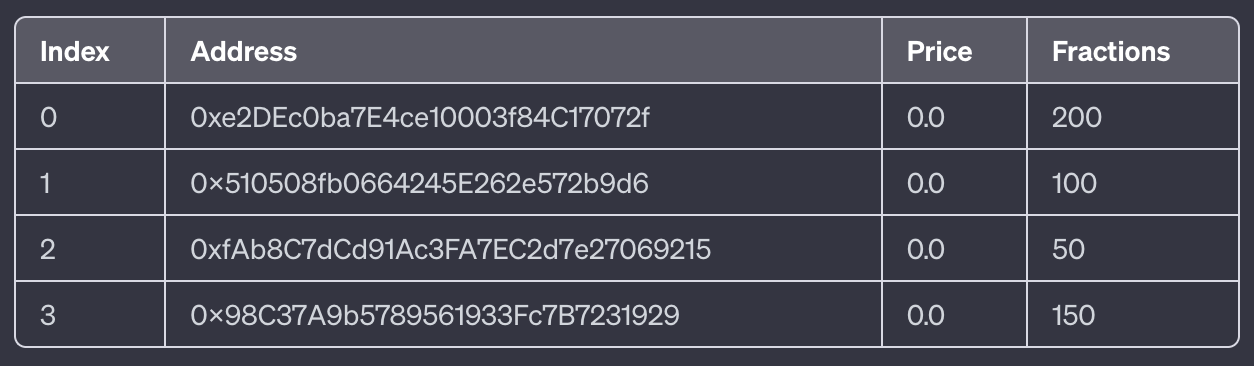
With a total of 500 fractions detailed in the CSV and the distribution percentage slider set at 80%, the overall amount of hypercert fractions is calculated to be 625. Out of these, 500 fractions are allocated to the wallets listed in the CSV, while the remaining 125 fractions are attributed to the wallet of the hypercert creator.
In cases where you're creating a hypercert for a community using a personal wallet but wish to direct all funds to the community's multisig wallet instead of your own, there's a straightforward solution. Set the distribution percentage slider to 100% for CSV-only distribution. This method allows you to allocate all the hypercert fractions exclusively through the CSV file. Notably, you can include a multisig address for your community in the CSV. This approach ensures that all fractions are distributed to the community, with none being directed to the personal wallet used for creating the hypercert.
If you think there might be more than one instance of any wallet in your csv file, you can select the “Deduplicate” button. This will gather all instances of the same wallet address and sum up the fraction amounts to create one instance with a total number of fractions. More information can be found in the Hypercerts documentation.

To continue creating your hypercert, you have to confirm contributor consent and agree to the Terms & Conditions.
Now you are ready to mint your Hypercert. Be sure your wallet is on the Optimism Chain, and click create.

You will be asked to sign a transaction, and with this your hypercert will be created.
This will take you to the My Hypercerts page. Click on claim all fractions, you will again be asked for a transaction and you will get all available hypercert fractions to your wallet.

You can find your newly minted hypercert in this list. When you click on the hypercert, it will take you to that hypercerts page and here you can see the details of your hypercert. At the bottom you can see the list of wallets that have already minted this hypercert.

In summary, the creation of a Hypercert is a straightforward process that involves connecting your wallet, filling in detailed information about your project, setting up distribution parameters, and finally, minting the Hypercert on the Optimism Chain. The beauty of Hypercerts lies in their ability to encapsulate the essence of a project’s impact, neatly packaged in an NFT format. This not only adds a layer of authenticity and transparency to your work but also bridges the gap between blockchain technology and real-world impact.
Thank you for reading. For more insightful content and updates, follow us and stay connected to the forefront of blockchain innovation.
author : raybankless